In this reading, we'll learn how the data in a form can be sent to a
server, rather than staying in the browser. In web development, the
browser, tablet, phone or other device that people work directly with is
often called the front end
, in contrast to the servers, databases,
and other invisible infrastructure that is called the back
end
. Forms and Ajax are one of the primary ways that the front end
communicates with the back end.
Form Attributes
When we introduced forms earlier in the
semester, we didn't talk about any of the attributes of
the <form> element. Here is how it will usually look
like:
<form id = "form2" action = "some-script" method = "GET/POST" >
   <!-- Here go all elements of the form, such as <input>, <button>, etc. -->
</form>
We have seen the id attribute before, so, let's focus on
the two other attributes, action
and method.
- action specifies where the form content will be sent for processing
- method specifies how the form content will be sent to the server
There are two methods of sending the data to the server using the HTTP protocol: GET and POST. The main difference between GET and POST is how the data is sent to the server.
- GET will append the form field names and values onto the end of the URL as key/value pairs.
- POST sends the data at the end of the request, rather than in the URL, and so values are not visible in the URL.
The two forms below are identical and they have the same value
for action (referring to the
script simple-script.php), but one uses method=GET and the other
method=POST. Try them out and look at the URL bar to see
the difference.
You probably saw something like this, depending on how you filled the form out:
GET: POST: 

Because submitting forms generates an HTTP request, you can use the Network tab in the Inspect Element window of the browser to inspect the details of sending forms, including how the data is packaged to be sent to the server.
In this course, we'll stick to POST, but the default is GET, so make
sure you always specify method="post" in your forms.
Scripts on the Server
Where does the form data go? What happens to it? These questions are
mostly outside the scope of this course, but we'll give you a peek at
it. The data goes to a server somewhere on the internet, wherever you
specified in the action attribute of the form. Once there, it
gets processed by some script (a program running on the server).
That script could do anything (update a database, charge your credit card, transmit instructions to someone at a warehouse, etc.) In this course, we won't explore those further. We will, however, look at some scripts that can do a few simple things.
Simple PHP to process your Forms
A widespread, server-side language called PHP can be used to process
the form data sent from a browser and email it to someone. To avoid the
PHP script being exploited by spammers, the PHP script will have the
destination hard-coded
into the script. That is, the form data
can only be sent to a destination of your choosing, not the sender's.
This is perfect for emailing a "contact us" form to your organization's
secretary, emailing the contents of an order form to your organization's
fund-raising chair, and so forth.
We will not burden you with having to learn PHP just to use this
ability. Instead, we'll provide you with a mechanism for creating a PHP
script that sends email to your desired recipient
(the to
address). It will work a lot like the
following, except that you won't be able to specify the
recipient. (Here, we've limited the appeal to spammers by fixing the
text that is sent.).
Fill out and submit the form below, and then check your email.
RSVP to Nick's Deathday Party
(Here is the form in its own web page.)
In order for the script to access your name and address, the form needs
to contain an input named from_name and another
named from_email. Here is the code of our simple form:
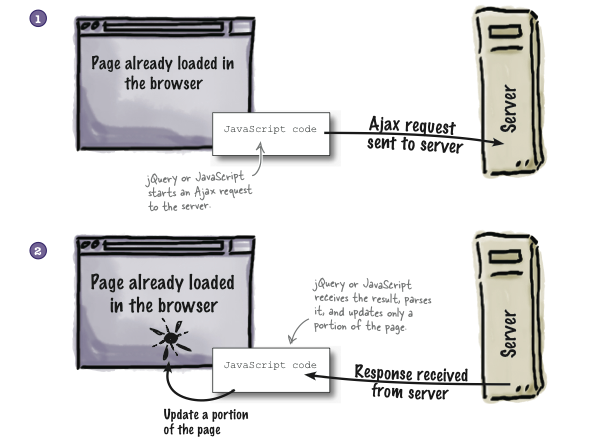
Ajax Technology
The problem with the first above-shown technique is that it redirects the user to a new web page. In fact, every time a form is submitted, the browser page is automatically either refreshed, or redirected to the result sent by the server. In the example above, the response was fairly ugly (JSON notation), while in practice we would make the result look a lot prettier. Nevertheless, it will still be a new page.
Sometime we might desire this, but sometimes not. In fact, it is quite common to expect to get notifications on the same page that we are already using. For that purpose, we will use a technology named Ajax.
Ajax, which stands for "Asynchronous JavaScript and XML", is a way of
passing data in a structured format between a web server and a browser,
often without the user being aware of such a transaction, because there
is no page refresh or redirection to a new page. Thus, with Ajax and
some DOM manipulation, you can load or reload only a portion of the page
with jQuery and JavaScript. It's spelled either AJAX
or Ajax
; we'll use the latter.
To think about Ajax in action, consider Facebook: when you like an item, that doesn't just update the page you're looking at; it sends information to scripts running on FaceBook's servers to record that fact in a database, so that it can count and display the number of likes. The browser sends that information using Ajax, so that nothing interferes with your reading of the page. When you comment on a post, you're filling out a little form and submitting it to Facebook's servers, again using Ajax. When Facebook sends you new updates without your having to re-load the page, that's Ajax again.
(Although when the technology was introduced, the XML format (a relative of HTML) was used for exchanging data between the server and the client, nowadays, JSON (Javascript Object Notation) is the preferred format. This is what we will use as well. In fact, you might have noticed that the ugly non-Ajax response above was, in fact, JSON notation, which is a variant of our JS Object literal notation. The main difference you've seen is that property names are in quotation marks.)
The way Ajax works is summarized in the graphics below:
The Ajax technology is implemented within the jQuery library and can be used easily in our Javascript applications. In this course, we won't explore Ajax in all its glory, but we will use it to gracefully send email using a special PHP script on the server.
Posting Data Using Ajax
We can use Ajax to send data to a back-end server in the same way
as method=post in our form.
Let's first see it in action. Here is the previous RSVP
example, with the addition of a button to submit the form via Ajax. Try
both! (In real life, we would probably remove
the type=submit button, rather than have both. But for now,
we want to compare the behavior.)
You can also use the form in its own web page: Deathday form Ajax.
First, let's look at the HTML:
You'll notice that we added a type=button button. We also
created a place on the page to put the response from the back-end
server. We don't have to do that; we could signal the user in some other
way, or we could completely ignore the response.
Now, let's examine the JavaScript code:
The first line just makes sendmail the event handler for
the Ajax button, which is just a plain button, rather than
a submit button.
The sendmail function prepares for just one call to the
jQuery .post() method. Notice that
the .post() method doesn't have a selector, because it's
not operating on a particular element, but instead is doing an Ajax
request, submitting the form using POST.
The .post() method takes four arguments:
- The first argument is where to send the data. This is
typically a URL. Here, we've just retrieved the data from the
form's
actionattribute. - The second argument is what data to send. This is a JavaScript Object, consisting of properties and values corresponding to the names and values of form controls. Here, we only have two inputs to send.
- The third argument is a function that
will handle the response from the back-end server. Here,
we've said that the
handleResponsefunction will get and process the response. More on this in a moment. - The fourth argument is the type of data we expect the response to be. Here, we've specified JSON. (The particular scripts we will be using in CS 110 will always respond using JSON.)
It takes us a few steps to get ready for
calling .post(). First (line 14), we retrieve
the action attribute. Then, on lines 15 and 16, we pull two
values out of the form. On line 17, we construct a JS object out of both
of them. Finally, we call .post().
The JSON response from the back-end will be converted into a JavaScript
object, and the handler function will be invoked with that object. So,
let's look at the handleResponse function next.
As we know, that function gets invoked with a JS object. In this case,
the object will contain two properties: status
and text. The status property has two possible
values: "ok" and "fail", both strings. The rest
of the handleResponse function is straightforward code using
a conditional to check whether the status is "ok", and if it
is, giving a cheery green notice, and other wise giving notice in scary
red. In either case, the notice is just the text of the
response, inserted into the response_element.
Sending Mail to a Fixed Address
The next step is to discuss a more general kind of back-end script, than the script above that is only good for accepting an invitation to Nearly Headless Nick's Deathday party. The script we'll discuss is one that will send email to a predetermined address, such as the secretary of your student org or the sales clerk for your fund-raiser — whoever should get the email that your website will allow people to send.
In class, we'll talk you through the process of creating and
downloading a special-purpose PHP script that you can put on your back-end
server (in the same folder with your HTML pages) that can be
the action for your forms. It will have an email address
of your choosing embedded in it.
Here's an example of the kind of email script we will use.
You'll notice that it takes four fields:
- from_name: this is the real name of the sender (the person filling out the form), like "Wendy Wellesley" or "Cathy Customer"
- from_email: this is the email address of the
sender, like
wwellesley@gmail.comorccustomer@hotmail.com. - subject: this is just like the subject line of any normal email message.
- body: this is just like the body of any normal email message.
The last two are self-explanatory, since all of us are very experienced with email. The first two are sorta new, because that's usually handled by our email software, like Gmail or whatever. Here, we need them because the person visiting our website is otherwise anonymous. (In fact, we can't prevent them from lying to us, or sending useless emails; let's hope that doesn't happen.)
When we write our JavaScript to use this PHP script via Ajax, we'll have to construct a JS object using those four properties. Like this:
var what = {from_name: "Harry Potter",
            from_email: "hpotter@hogwarts.ac.uk",
            subject: "My Scar",
            body: "Dear Padfoot, my scar's been bothering me lately ..."};
$.post(where, what, ...);
Formatted Email Messages
Of course, we don't want to restrict our forms to those four fields. We'd like to have forms where we can ask to be added to an email list, order Weasley Wizarding Wheezes, or any of many other things we might want.
To do that, we're going to build on our knowledge of how to
do Madlibs. Think of the madlib as the body of the
formatted email message that we want to send. We can write JavaScript code
that will take our arbitrary form, insert the key data into a hidden
element much like our MadLibs story, then extract the whole contents of
the MadLibs using jQuery's .html() method. (Or, better,
use .text() method, which will give us just the text,
omitting all the HTML markup.)
The following form demonstrates the idea. It really sends the data to a back-end script, but this script just describes the email that would have been sent (but doesn't really send one). So, feel free to try this as much as you'd like. The response text is printed to the JS console; open it up to see.
Here's the madlib
letter that we will send. In real life, we
would use display:none in CSS or the
jQuery .hide() method to make this text invisible, but you'll
want to see it:
Dear Fred and George,
Please send by return owl the following:
fainting fancies
fever fudge
nosebleed nougat
puking pastilles
Signed ()
Finally, of course, you should take a look at the JavaScript. You can
see that we've added one new function, formatLetter, which
looks a lot like your MadLibs code. The placeOrder function
first calls formatLetter, and then proceeds as it did before,
except that now the body comes from the formatted letter.