Lab: Social Feed Mockup
Video
This lab has a ~35-minute video walkthrough that goes over the solutions, which you can watch on YouTube or download to view later. Caption files will be available for download as well when they're edited (I'm currently behind on this).
Since the video walks through the solutions, it is recommended that you attempt to solve each exercise yourself before watching the relevant parts of the video, and watch the video if you get stuck on something.
The video description on YouTube includes links to each part of the video if you're looking for a part that covers a specific task.
Download video | Download captions (coming soon)
Solutions
Goals
- Practice advanced JavaScript control of HTML elements.
- Implement a mock-up of a social media feed.
- Think about how to display dates to the user.
Setup
From your download folder, download the lab10 folder and open
the feed.html and feed.js files in your code editor.
Background
So far, we have used the document.getElementById function to reference HTML
elements from within JavaScript, and the .innerHTML property of those HTML
elements to change what is on the page by replacing the contents of entire
elements. For this lab, instead of replacing the contents of an element, we
will add to it, by grabbing the old value, adding stuff to create a new
value, and putting that modified value back into the page.
We will also be using a few different custom functions to do that, and getting practice with parameters and return values at the same time.
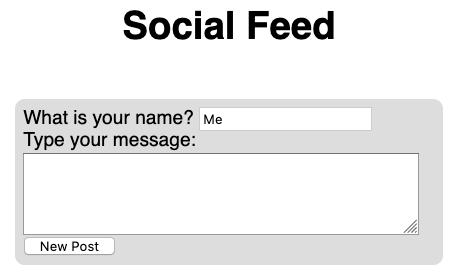
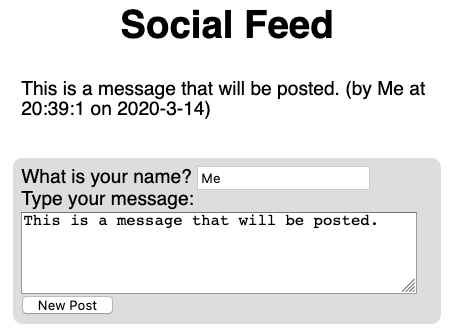
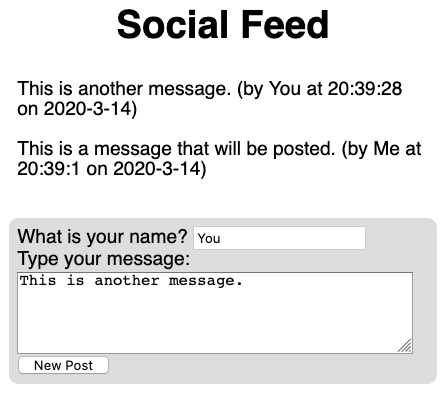
In this lab we'll be building a mock-up of a social media feed: a page where there's space to enter new text, and each time you click a button that text gets added to the page along with information about when it was added, to create a feed of posts. These screenshots show what that looks like before and after using the "New Post" button to add two posts. Before adding a post:
After the first post has been added:
After a second post:
Task 1: Accessing the Inputs
To start with, we need to be able to access the values of the text inputs for
the name and message. To simplify this, we'll create two functions, called
getAuthor and getMessageToPost which don't need any parameters, but which
automaticcally grab the correct values from the page and return those
values as strings. Once we have these functions, the rest of our code can just
call them whenever it needs to access the user input.
The feed.js file contains the start of both functions; fill them out so that
they use document.getElementById(...).innerHTML to return the correct
values.
You can test these functions by pasting the following pieces of code into the console:
getAuthor();getMessageToPost();They should return whatever is currently in the text inputs on the page.
Task 2: Formatting the Date
Next, we need to be able to display the date to the user as a string. Date
objects have a default appearance, but we want to customize that. To do that,
we've started the definition of a formatDateAsString function. This function
has both a single parameter and it will return a value. When someone
gives it a Date object (as the parameter) it should return a string
representation of that Date object that includes the time and date like this:
12:34:56 on 2020-1-2You can test this function by pasting the following code in the console:
var now = new Date();
formatDateAsString(now);
Notice how since the function needs a parameter and it needs to be a date object, in order to call it we first need to create a Date object.
Task 3: Displaying a Message
The displayMessage function is designed to take a few parameters and add a
new message to the page. You can look at the code for postMessage which we
have provided (at the bottom of feed.js) to see how displayMessage is being
used in that function. The three parameters to displayMessage will be:
- A string representing the message to display.
- A string representing the author of the message.
- A Date object containing the time at which the message is being posted.
The job of the displayMessage function is to add the new message to the
beginning of the #feedId div. It will need to extract the old contents of
that div, use its three parameters to construct a single message string, and
then add together that new message string plus the old stuff (plus maybe some
<br> tags in between) and put all of that back into the #feedId div.
The text that we want to add to the div combines the actual message text, the author value, and the formatted date, so for example, if we call:
var labDay = new Date(2020, 3, 15);
displayMessage("A message.", "Me", now);
The text that is added to the page should look like:
A message. (by Me at 0:0:0 on 2020-4-15)Fill in the code so that it does that.
Once your function is done, you can paste the following code into the console to test it:
var now = new Date();
displayMessage("Hi", "Me", now);
If everything is working, calling the function like that should add a new post to the feed div. If you paste it multiple times, you should see multiple new posts appear.
Task 4: Cleanup
Since we already gave you the postMessage function, when displayMessage is
working, the New Post button should work as well.
Test whether it works, and fix any errors that are still remaining.
Extra Task: Custom Date String
Right now, the posts just say exactly when they were created. But it would be
more convenient if they gave a relative date, like "today" or "yesterday".
Modify your formatDateAsString() function so that it returns a relative date
string by adding some conditionals that check for common values. You can get
more complex if you want, but just getting "today" to work is fine. To do this,
your reportDay() function should create its own new Date object to compare with
the Date object that it receives as an argument.
Extra Task: Structured Posts
The feed.css file contains rules that apply to .post, .post .time, and
.post .author. But we don't have any HTML elements with those classes
attached to them. That's because when we load the page, there aren't any posts.
If you change your displayMessage function so that the HTML code that it
inserts into the page contains structure with these classes, your posts will
appear with formatting. The curent CSS rules are set up to expect a <div>
with class "post" for each post, and within that, two <span>s with classes
"author" and "time", but feel free to come up with your own post structre
and modify the CSS to fit.
It's a bit tricky to figure out how the HTML tags fit into the strings in JavaScript so that they can be put into the page, so feel free to ask questions about this extra task if you are interested.
Extra Task: Style
Now that you have a working mock-up of a social media feed, make it pretty. You can add colors, fonts, and borders. You'll need to create a new .css file for your style code and link it from the HTML file.